Assalamu Aleikum (Come and go in peace)
Hello

On request, I decided to make a step by step video on how to make dem banners.
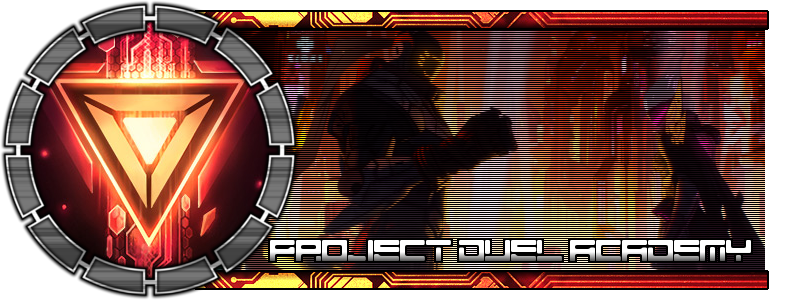
But first, lets take a look at how this will end

What you will need:
Gimp (Or PhotoShop)
A render (Will explain) (I use 1-2 renders)
Grunge brushes (For either PhotoShop or Gimp)
Special brushes (Will explain)
A desktop folder named "Renders"
A desktop folder named "Banners"
Internet
Patience
Now that we've covered suipplies, lets make dem banners!
Step 1: Download
Gimp Or
Photoshop Step 2: Get a grunge brush set, and one other set you think is 'pretty.'
A list of the sets can be found
Here I'm using the
Floral Brush set, and the
Abstract Brushes Set.
Step 3: Find a render (preferably two) that you like
A list of yugioh renders can be found
HereI'm using
Wynn the Wind Charmer and
Caam, Serenity of Gusto Right click the renders, and click "Save image as..."
Here is the part where you use the first folder form earlier. save it in Desktop>Render
*NOTE* Jpeg images DONT work. Also, save the image with an extinction of either .gif or .png (.gif is better)
Step 4: Remember those brushes from earlier? Now we have to add them to gimp/photoshop
Open up the .zip file you downloaded earlier (The brushes). Copy all of the brushes in there (Dont copy the thumbs)
Next, go to
Local disk (C:) > Users > Owner > .gimp2-8 > brushes Paste all brushes there.
Step 5: Now we start with the actual designing! Open Gimp/Photoshop.
Go to
File > New Height 500 Width 150. Make sure its a white background
Go to
File > Open Then
Desktop>Renders and select the render you chose earlier.
Step 6: Go to the 500x150 blank image. Click your paint brush tool. On the tool options, increase its size and switch it to a grunge brush. Brush over the blank image. This is our background.
This is what I came up with
Make it as dark or as light as you want. We're going to modify the background some more at the end.
Step 7: Now make a new layer.

Go to the render you opened up earlier. Select it and click Ctrl+C.
If your render isn't too big, it can be used as a brush rather than a pasted image. Im using Wynn the Wind charmer as a brush.
Go back to the image. Go to tool options, brushes, and select the very first brush there. Size the render/brush to a size thats suitable for you, and paste it 3-4 times on the new layer.
 *ALTERNATE STEP 7*
 If your render isnt big enough to be used as a brush, then we have to do it the hard way.
1.Go to the render.
2.Press Ctrl+c.
3.Go to the banner
4.Press Ctrl+V
5.PRess Shift+Ctrl+N
OR Right click it and go to
Layer > To new Layer 6. Click the resize tool

7. Resize it to desired size
8. Move the render to desired location
Step 8: With the render layer selected, go to
Colors > Brightness-Contrast...Change its Brightness-Contrast to desired settings.

Step 8.5: (Skip this step if you're only using one render) Make a new layer, above the background and below the primary render (If you want the two back-to-back, use the same layer as the render)
Open your second render
Repeat step 7 or Alternate Step 7, then repeat step 8.


Step 9 (OPTIONAL): Go back to the primary render. Go to
Colors > Hue-Saturation Change the Hue to desired length

Step 10: Now, we go back to our background. On the layers section, only allow the background to be visible.
Go to
Colors > Colorize Mess around with the sliders until a desired color is reached

Step 11: Now, we make it pretty. Remember those extra brushes from earlier? Go crazy.

Step 12: Select the Text Tool

Select a space for the text and type it in. I'm using 'Class Room'
Make sure its a large font size and a color that shows up.

Step 13: Again, add text under that text. Repeat this step if needed.
*TIP* Use Sans for the title, and Arial size 14-16.

Step 13.5: Sign your name. Not sure what else to say (lol)
Go the any corner of the design: Using the text tool, type your name, and chose a desired font (14pt size), I personally use a Segoe Script 14 pt gir -->
Gir 
Step 14: Add any other shit you want.
Step 15: Go to
File > Export to > Desktop > Banner and Export it as desired file with an extinction of .Png


Step 16: Go to
Www.Picmonkey.ComClick edit a photo
Select recently made banner
Click 'okay'

Step 17: Go to the effects section on the editor

Scroll down, and click dark edges

Click it
Size 15% Intensity 100%

Click 'Apply'
Step 18: Save the new image

 *Note*Make sure its saved as a .PNG image.
Step 19: Upload onto Imgur.com Then, publish your masterpiece.